
-
Recent Posts
Recent Comments
Archives
Categories
Meta
-
Recent Posts
Categories
Cyber Range Lab Assignment 4
In this lab we take a look at how Snort rules are written and configured, as well as how to make use of them when they are noisy. We then look at iptables, and configure a local host-based firewall to allow HTTP connections outbound.
Posted in IST 894 Portfolio
Leave a comment
Cyber Range Lab Assignment 3
This lab is titled: Hands-on with Encryption Primitives and Block Cipher Modes of Operation.
In it we use and compare four different AES-128 modes of operation in different file types and situations to see which are more secure and which are more resilient to data corruption.
Posted in IST 894 Portfolio
Leave a comment
Cyber Range Lab Assignment 2
This laboratory exercise is about password auditing and buffer overflows.
Posted in IST 894 Portfolio
Leave a comment
Cyber Range Lab Assignment 1
This laboratory exercise focuses on Linux networking and command line tools.
Posted in IST 894 Portfolio
Leave a comment
Cyber Range Evaluation Report
This report performs a comparative analysis of three commercial cyber range platforms based on a comparison matrix to score them based on their features.
Posted in IST 894 Portfolio
Leave a comment
Use Bro to spot SSL phishing pages (part 1)
A lot of phishes are starting to use SSL certificates, and this makes things interesting for a few reasons. Two big ones are:
– End users are trained to look for the green padlock, because if it’s there the page is secure!
– Encrypted traffic makes it more difficult to monitor with traditional IDS/IPS
Comparing what it would take to try to get around those two issues, finding a way to inspect the traffic it probably going to be easier than re-training your userbase.
To try to find these sessions going to most-likely-malicious sites, I’m going to use Bro to do a few things:
– Log all SSL certs that it sees
– Write a notice script to look for certs that have your domain in them, but not your CA.
– Compare every cert to the ICSI Certificate Notary
Bro has a lot of these features built in, but not enabled by default. I’m going to show how to get these turned on so you can start tracking the SSL certs you see, and part 2 will be using the notice framework to take action when a cert meets that criteria that it’s likely malicious.
Both parts of the SSL cert logging are turned on in the local.bro config. In Security Onion that file is here: /opt/bro/share/bro/site/local.bro
The first command is one you add in to log every cert, and the other two you can uncomment to enable them.
# Log every SSL cert you see
@load protocols/ssl/extract-certs-pem
redef SSL::extract_certs_pem = ALL_HOSTS;

# This script prevents the logging of SSL CA certificates in x509.log
@load protocols/ssl/log-hostcerts-only

# Uncomment the following line to check each SSL certificate hash against the ICSI
# certificate notary service; see http://notary.icsi.berkeley.edu .
@load protocols/ssl/notary
Once you edit your local.bro config, you’ll need to deploy the new configs which installs them and restarts the service.
root@heimdall:/# broctl deploy
checking configurations ...
installing ...
removing old policies in /nsm/bro/spool/installed-scripts-do-not-touch/site ...
removing old policies in /nsm/bro/spool/installed-scripts-do-not-touch/auto ...
creating policy directories ...
installing site policies ...
generating cluster-layout.bro ...
generating local-networks.bro ...
generating broctl-config.bro ...
generating broctl-config.sh ...
stopping ...
stopping heimdall-eth6-1 ...
stopping proxy ...
stopping manager ...
starting ...
starting manager ...
starting proxy ...
starting heimdall-eth6-1 ...
Finally, to check that everything is being logged appropriately, go to /nsm/bro/logs/current/ and look at x509.log and ssl.log.
# tail -f x509.log | grep google
1521823138.074886   FS7qq2r7IDquPEj9j   3   2C07C78DFDF8C840    CN=*.googleusercontent.com,O=Google Inc,L=Mountain View,ST=California,C=US  CN=Google Internet Authority G3,O=Google Trust Services,C=US    1520451687.000000   1527706320.000000   id-ecPublicKey  sha256WithRSAEncryption ecdsa   256 -   prime256v1  *.googleusercontent.com,*.apps.googleusercontent.com,*.appspot.com.storage.googleapis.com,*.blogspot.com,*.bp.blogspot.com,*.commondatastorage.googleapis.com,*.content-storage-download.googleapis.com,*.content-storage-upload.googleapis.com,*.content-storage.googleapis.com,*.doubleclickusercontent.com,*.ggpht.com,*.googledrive.com,*.googlesyndication.com,*.googleweblight.com,*.local.amp4mail.googleusercontent.com,*.prod.amp4mail.googleusercontent.com,*.safenup.googleusercontent.com,*.sandbox.googleusercontent.com,*.storage-download.googleapis.com,*.storage-upload.googleapis.com,*.storage.googleapis.com,*.storage.select.googleapis.com,*.translate.goog,*.validator.amp4mail.googleusercontent.com,blogspot.com,bp.blogspot.com,commondatastorage.googleapis.com,doubleclickusercontent.com,ggpht.com,googledrive.com,googleusercontent.com,googleweblight.com,manifest.lh3.googleusercontent.com,static.panoramio.com.storage.googleapis.com,storage.googleapis.com,storage.select.googleapis.com,translate.goog,unfiltered.news -   -   -   F   -

# tail -f ssl.log | grep google
1521823217.898206   CujJlbaiGNUwroQKj   192.168.254.204 43498   216.58.217.174  443 TLSv12  TLS_ECDHE_ECDSA_WITH_CHACHA20_POLY1305_SHA256   -   clients4.google.com T   -   h2  T   -   -   -   -   -   -   -   -   -   -   -
Now if you find a phishing site that is using SSL, you can search your Bro logs for that cert to see who has gone out to the site. In the next post, we’ll do some automation around this.
Posted in Bro
Leave a comment
How to Integrate CIF feeds into Bro Intel files
So you set up a SSH honeypot and are gathering data, but what do you do with it?
If you have Bro installed, you can integrate your feeds for monitoring in less than 15 minutes. I’ll show you how to pull a feed of your data from CSIRT Gadgets back down in a format that Bro can ingest and log (and alert if you choose) any time Bro sees any of the data in these feeds. I’m only setting up IP addresses in this tutorial, but you can output feeds of URLs, FQDNs, and even file hashes for Bro to use.
If you’ve never used the Bro Network Security Monitor tool, check out Security Onion it’s great for a quick set up in a small environment, but if you’re looking to inspect multiple gigs of traffic you’ll likely want to configure your own environment. This tutorial uses Bro inside of Security Onion, but the concepts are the same if you installed a custom installation.
- Configure CSIRTG.io account/token
- Install PIP, and csirtgsdk
- Configure csirtg client
- Create cron job to pull feeds hourly
- Enable intelligence framework in Bro
- Install/deploy updated Bro Config
Step 1: Configure CSIRTG account
The goal here is to pull your feed back down in Bro format, in order to do that you do that you need to install and configure the csirtgsdk client.
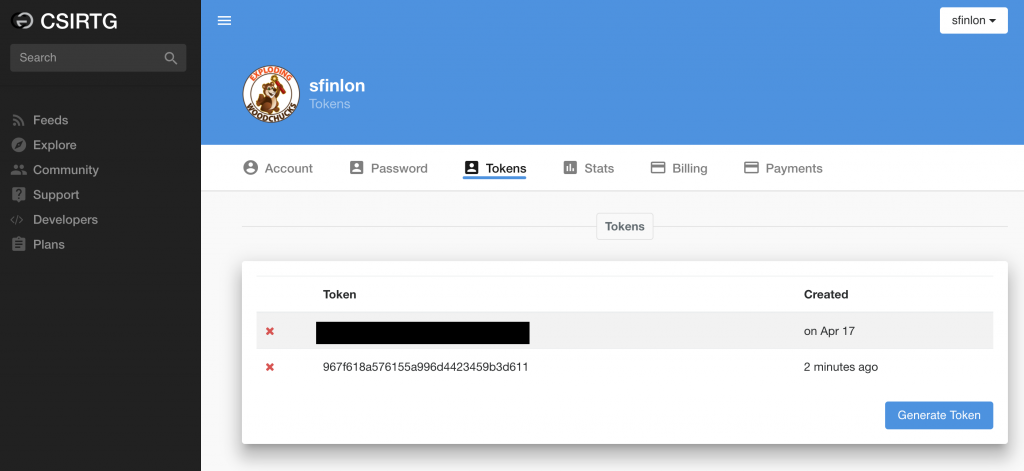
Since you already created your CSIRT Gadgets account when you set up your SSH honeypot, you just need to log in and take note of an existing token or create a new one.
Step 2: Install Python/PIP and the csirtgsdk
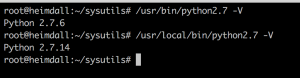
Ubuntu 16.04 is straightforward, but if you’re running the Security Onion ISO it’s based on Ubuntu 14.04 and you need to manually install a newer version of python/PIP.
For Ubuntu 14.04:
Go in to a ‘working’ directory, and pull the Python 2.7.14 source:
$ wget https://www.python.org/ftp/python/2.7.14/Python-2.7.14.tgz
Unzip the tarball, and then go in to the directory and configure/build to install Python 2.7.14
$ tar -zxvf Python-2.7.14.tgz
$ cd Python-2.7.14 && ./configure && sudo make altinstall
The altinstall flag tells the installer not to overwrite the oringal python binary, so now you’ll have python 2.7.6 in /usr/bin and python 2.7.14 in /usr/local/bin
Go back to your ‘working’ directory, and pull down this script to pull the latest PIP installer
$ wget https://bootstrap.pypa.io/get-pip.py
$ sudo /usr/local/bin/python2.7 get-pip.py
Now that you have a working python2.7.14/PIP environment you can just install install csirtgsdk
$ sudo pip install csirtgsdk
For Ubuntu 16.04:
You just need to update your system, and then install PIP and then csirtgsdk.
$ sudo apt-get update && sudo apt-get upgrade
$ sudo apt-get install python-pip
$ sudo pip install csirtgsdk
Step 3: Configure the csirtgsdk
Create a .csirtg.yml file under the users home directory. I run csirtg as root, so the file is just /root/.csirtg.yml.
In the yaml file you only need to specify the user and token
# cat /root/.csirtg.yml
user: sfinlon
token: 967f618a576155a996d4423459b3d611
With your yaml file set up you should be able to run # csirtg --feeds to show all of the feeds your user has.
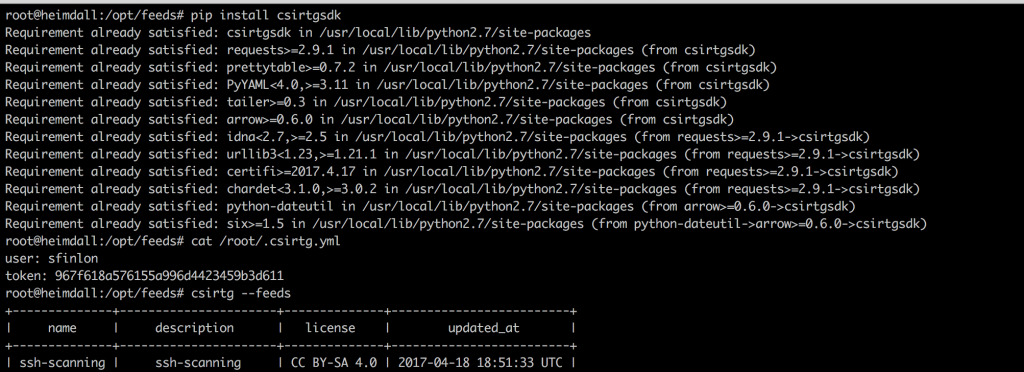
With your csirtgsdk set up, you can run # csirtg --feed ssh-logger --format bro --limit 5 and it will output the first 5 entries in your feed in format for a BRO intel file.
Step 4: Create a cron job
Create a feeds directory at /opt/feeds, and pipe the feed results to ssh.intel. You need to pull the feeds on a regular basis, because new data is always being added. In order to do this, set up a cron job to run every hour (I use a random minute so that the CSIRTG servers don’t get slammed by everyone at the same time. Edit the user cron with crontab -e and go to the bottom of the file and put something similar to this, but change the 18 number to a random number between 1-60.
Bro versions before 2.5.1 have issues with where reading a corrupted entry in the intel file will cause it to stop the intel alerting until Bro is restarted. Workaround is to write the feed to a temp file and then copy it to the one Bro is reading:
# crontab -e
18 * * * * /usr/local/bin/csirtg --feed ssh-scanning --format bro > /opt/feeds/ssh.intel.new && mv /opt/feeds/ssh.intel.new /opt/feeds/ssh.intel
Step 5: Enable the frameworks in Bro
Now that the feeds are being pulled and updated, you need to configure Bro to read the intel file and set up logging/alerting.
To do this, you need to enable the Intelligence framework, and the Collective-Intel policy script in Bro.
Since we are pulling the feeds hourly, I set the intel feed entries to expire in Bro after 60 minutes. This way if an item is removed from the feed, it doesn’t stay forever.
You just need to tell Bro where the intel feed files are, and to read the files in.
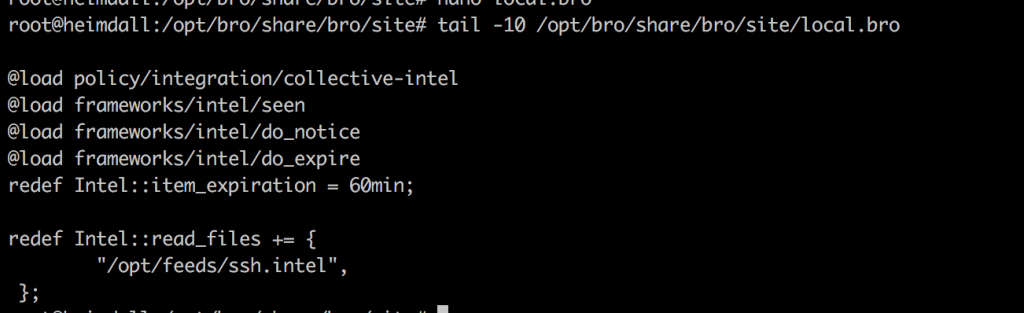
To do this edit /opt/bro/share/bro/site/local.bro and put in the following lines:
@load policy/integration/collective-intel
@load frameworks/intel/seen
@load frameworks/intel/do_notice
@load frameworks/intel/do_expire
redef Intel::item_expiration = 60min;
redef Intel::read_files += {
        "/opt/feeds/ssh.intel",
 };
Step 6: Deploy the new configs
After you edit the local.bro file, you’ll need to install/deploy the updated config. Bro reads the .intel files in real time so any time they are changed/updated you don’t need to do anything else for Bro to update the feeds as they come in. Just running broctl deploy will check the config, update broctl installation and config, and restart the services.
# broctl deploy

Now any time that Bro encounters an IP, URL, or Hash that is in one of the feeds, it will generate an entry in the intel.log file, which on Security Onion is here: /nsm/bro/logs/current/intel.log
Posted in Bro, CIF, CSIRTG
Leave a comment
Install a SSH honeypot, and have the data logged in 3 easy steps
Did you ever wonder who is trying to log on to your server?
Here is how to set up a SSH honeypot inside of a Docker container that sends the data to CSIRT Gadgets using the Collective Intelligence Framework (CIF) in 3 steps. Sending the data to CSIRT Gadgets is great because you can then pull the data back down to be injected in to your IDS, or any other number of uses like by a SIEM for correlation.
Below is a short video that shows the entire process that takes less than 90 seconds(once your csirtg.io account is set up) on an Ubuntu 16.04 server, but will work on any *nix machine that can run Docker and Python 2.7.14+
For those less trusting of scripts found on the Internet, I’ve detailed the steps below the video.
90 Second install!
- Create an account on CSIRTG.io if you don’t have one
- Set up a ‘ssh-scanning’ feed
- Create a token for your account
- Change your real SSH server to run on a non-default port. I normally use 2020, but you can use whatever suits your fancy
- You do this in the /etc/ssh/sshd_config file
- Then do a
sudo service ssh restartto restart it on the new port
- Run this command from your Ubuntu 16.04 box
- Enter your CSIRTG username/provider/token when prompted.
$bash <(curl -s https://gist.githubusercontent.com/sfinlon/f639699db8ce9ea4d87187b21f3c792f/raw/54fab1e785daf084b0277774da55cb513307c001/ubuntu-ssh-logger-install.sh)
My public feeds can be seen here https://csirtg.io/users/sfinlon
Once your CSIRTG account is ready to go, the rest takes less than 2 minutes! The video below picks up right after your CSIRTG account and token is setup.
For those of you less trusting of scripts found on the Internet, here are the steps laid out for you.
Step 1: Create account
Go to csirtg.io and sign up to create your username.
Create a feed called 'ssh-scanning'.
Finally create a token for your account, you'll need this in step 6.
Step 2: Move SSH port
Change the SSHD default port, by updating the line in /etc/ssh/sshd_config that says
Port 22 to Port 2020 or run this command:
$ sudo sed -i 's/Port\ 22/Port\ 2020/' /etc/ssh/sshd_config
Step 3: Install Ubuntu packages
Install docker.io and PIP on Ubuntu with this command:
$ sudo apt-get update && sudo apt-get install docker.io python-pip
Step 4: Set up Docker container
Once Docker is installed, pull down Justin Azoff's ssh-auth-logger and run it. This command pulls the latest image from hub.docker.com, set it to start the container to auto restart on failure, and exposes and publishes port 22 of the Docker container to port 22 of the host:
$ sudo docker run -d -p 22:22 --expose=22 --name=sshlogger --restart=always justinazoff/ssh-auth-logger
Step 5: Install CIF
Install csirtg-smrt and csirtgsdk:
$sudo pip install --upgrade pip && sudo pip install csirtg-smrt csirtgsdk
Step 6: Set up CIF to tail Docker container
Because ssh-auth-logger just logs any IP that tries to connect to it and outputs it to STDOUT we need to install the service files that configure csirtg-cef to tail the Docker container.
- Edit the csirtg-docker.service file and change the provider and feed to whatever you set on csirtg.io and update --tail-docker to whatever you named your container.
- Edit the darknet.env file with your csirtg.io username, token and use 'ssh-scanning' as the feed.
- These commands pull the files down from github, and puts them where they need to go. Make sure you edit both files with your variables before you copy them:
$ git clone https://gist.github.com/1eddaa3d1a4de129dcf27cd90f90ec93.git
$ sudo cp csirtg-docker.service /etc/systemd/system/
$ sudo cp darknet.env /etc/
Step 7: Start/check services
First, check the Docker container is running, because csirtg-cef won't run if it isn't. This will show the status of all containers on your system, running and not-running:
$ sudo docker ps -a
Once the ssh-auth-logger container is verified to be running, start up the CSIRTG service.
$ sudo service csirtg-docker start
Finally, after it's been started, check it to verify it's running properly. If it's encountered an error and exited, you'll have to double check the configuration and/or other services to make sure they are running.
$ sudo service csirtg-docker status
Posted in CIF, Docker, SSH
Leave a comment